Helium hotspot miner Sensecap m1 tuning
how to optimize your Sensecap m1 for maximum earnings? Follow along!
What?
Helium mining is unfortunately based on the speed of the answer since HIP83. So basically, the faster the Helium Miner is the more selected witnesses it gets.
This is not linked to antenna, amplifier and others, of course this also is good. But it helps nothing if the miner answers all seen beacons to late!
So here we go all for speed, answering the beacon to the oracle as fast as possible 😀
How to measure this? The mobile app HeliumGeek gives a good reading, its Selected vs Witnessed.
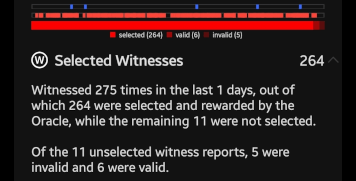
In this example are 275 Witnesses, with 264 selected. Thats 96%, about as good as it can get 🤑
Tuning?
There are 2 factors here that influence the speed, one is network latency, the other is the miner itself.
For the network latency is it depending on the internet connection. Like using WiFi or plugging it in via a network cable, the speed of the internet connection. But also the latency of the internet connection itself, so for example even a fancy 1000 Mbit/s internet can have 20ms ping, where a 30 Mbit/s could have a 5ms ping. The 5ms is way better! Its not the speed, its the latency that matters here.
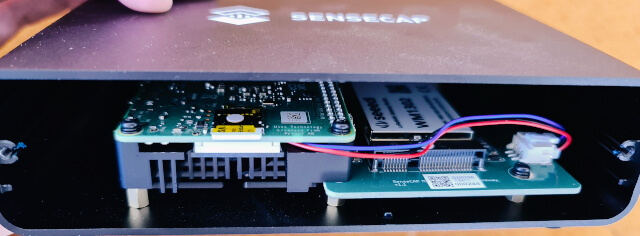
Sensecap M1 Speed
inside the M1 is a Raspberry Pi 4, and searching online lists many tuning settings for it. They mostly go for better SD cards and overclocking the CPU.
So does this help for helium mining? Not so much...
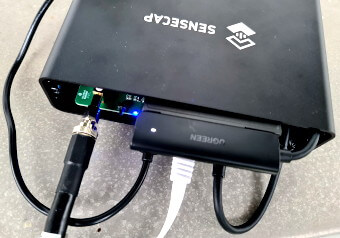
A good SD card is important, but more for stability in terms of break down over time. A Samsung Pro Endurance is good. SSD is not needed, i did run it with a Kingston A400 SSD on a UGREEN USB 3.0 SATA adapter. But that gives no measurable advance in terms of witnessing. But its fancy in terms of read/write speed at about 290 MB/s.
The other is overclocking, but hey, that will increase the stress on the CPU, and actually helium mining is not a CPU hungry application. So what can be done here? The CPU is idle nearly all the time, but when a beacon arrives it has to process it fast.
And the RPI4 clocks down to 600MHZ during this idle times to safe power and cool down.
So now is has to jump to a higher clock rate to process the beacon. This is controlled by the governor. The default governor is called ondemand and makes a compromise between speed and power safe.
Does not sound so good or? Yes... there are 2 better alternatives, performance and schedutil. Performance locks the CPU to 1,5GHz, this is the highest performance. And schedutil is a faster one that still scales up and down.
So how to actually change this?
Sensecap M1 SSH setup
SSH is needed for this:
- Shutdown the M1 over the panel, take the SD card out of the Sensecap M1 and load it into your PC
- (Backup the config.json, dont share it, but keep it somewhere safe)
- use PuttyGen to generate a new RSA key, store the public and private key safely.
- Add the public key to the sshKeys section in the config.json [howto]
- Put the SD card back in the M1 and start it.
- Login with Putty: root@m1IP port: 222222 and Connection/SSH/Auth the private key file.
a first command could be: ping -c 4 1.1.1.1 what times do you get?
If you get login errors like Permission denied (publickey) check if the config.json is valid here: https://jsonlint.com/
Raspberry pi 4 governor change
a word of warning here, this increases the load on the RPI4, watch the temperature in the sensecap dashboard afterwards! I could see a increase of 1-2°C so its no problem for me.
cd /sys/devices/system/cpu
echo performance > cpu0/cpufreq/scaling_governor
this changes the governor to performance. Thats all.
More background it can be found here: Stackexchange.com/questions/9034/how-to-change-the-default-governor
It is not permanent, after reboot it will go back to ondemand! But who switches off the M1 anyway 😬
Reading the temperature over ssh:
cat /sys/class/thermal/thermal_zone0/tempThe alternative schedutil is the default for many linux distributions Wiki.archlinux.org/title/ Scaling governors
Comparing the governors, schedutil will give already most of the improvements. Performance is then the last 5% if you can even see it.
Looking at the time spend in the frequencys:
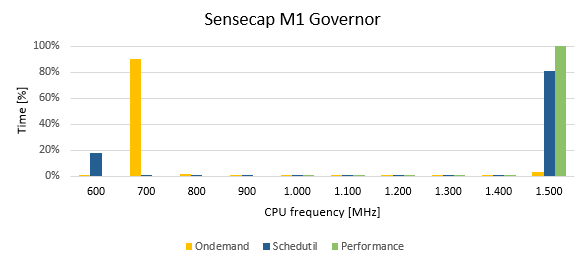
This is collected by checking the "time_in_state" after a couple of hours of runtime.
It shows that the default ondemand is mostly idle, just a small time is spend at full speed, but also never at full idle. Schedutil is often at full speed, and some time at full idle. And performance just locks the frequency to maximum all the time.
cat /sys/devices/system/cpu/cpufreq/policy0/stats/time_in_stateMake it permanent
the governor change must be entered after every boot, lets make this automatically!
On the Sensecap M1 systemd is used to run tasks, here are the steps needed to automate the governor change.
First, mount the system so it can be modified:
mount -o remount,rw /Create a service file and open it in vi:
vi /lib/systemd/system/governorchange.serviceThe content for this file:
 [Unit]
 Description=Governor to performance
 After=multi-user.target

 [Service]
 Type=idle
 ExecStart=/bin/bash -c '/bin/echo performance > /sys/devices/system/cpu/cpu0/cpufreq/scaling_governor'

 [Install]
 WantedBy=multi-user.target
Replace the performance with schedutil here if you like.
make it runable:
chmod 644 /lib/systemd/system/governorchange.servicereload the systemd daemon:
systemctl daemon-reloadEnable the service:
systemctl enable governorchange.serviceAnd last, lets see if all works:
systemctl status governorchange.serviceFrom now on it will change the governor to performance after the reboot 😀
Comments powered by CComment